A brief introduction to working with remotes
This is meant to be an introductory tutorial, primarily aimed at scientists, about using SSH along with other utilities (notably Tmux and x2go) to make working with remote machines hopefully a bit more pleasant. Following the tradition of 1000+ page technical books titled “Short introduction to X”, this introduction is anything but brief; this was unintentional. While there aren’t any prerequisites for following the material, some familiarity with the command-line is recommended.
The tutorial is made up of three parts:
- how to use SSH, with useful tricks and tips
- preserving your console environment on a remote (or locally) with Tmux
- preserving your graphical environment on a remote with x2go
You can refer to the table of contents below for quick navigation.
The procedures listed below should work on any Linux distribution as well as macOS, possibly with minor tweaks. Additional software that I’m not familiar with is needed on Windows, so I won’t be covering it, though I imagine they should also work with something like the Windows subsystem for Linux.
Note to UNIGE HPC users: I’ve verified that, at the time of writing, the procedures work on both Baobab and Yggdradsil.
A word about notation:
Characters written like this: X, Alt, etc. denote actual keys on your keyboard.
On Apple machines in particular, the Ctrl key should be substituted by the command (⌘) key.
Multiple keyboard keys separated by the + sign means that they should be pressed simultaneously.
Uppercase words written in brackets, like [THING], refer to variables which should be customized.
The exact details of the customization will be indicated in the text.
Command-line options (sometimes also called flags) are usually denoted with a dash in short form (like -r), or a double dash in long form (like --proxy), and should be, unless specified otherwise, placed directly after the name of the primary command itself.
The user’s home directory (usually /home/[USERNAME] on Linux, and /Users/[USERNAME] on MacOS) will be denoted by ~.
Part 1: SSH in brief
SSH is a program that allows you to securely connect to a remote machine1, and work on it like you would on your own.
Installation
To use SSH, you need two ingredients:
- a machine running an SSH server (which I will often refer to as just “remote”)
- a machine running an SSH client (your local machine)
To verify your machine has an SSH client installed, you can run:
command -v ssh
If the above command outputs something, it means you have an SSH client installed; if it doesn’t, you should search online on how to install it on your particular operating system, since there are many SSH clients available.
The remote will usually have an SSH server set up and running, so I won’t be covering the server configuration here.
Making the connection
Now that you have an SSH client installed, you can attempt to connect to a remote.
Assuming that you have a remote machine (cluster, desktop, etc.) somewhere which you know the IP address of (such as 192.243.49.1 or 48:f1:7f:c9:4b:a9), or a domain name, you can attempt to connect to it using:
ssh [USERNAME]@[HOSTNAME]
where [USERNAME] is your username on the remote machine (which, in case you’re not the administrator of the machine, should somehow be communicated to you beforehand), and [HOSTNAME] can be either the IP address or the domain name, depending on which one you know.
The above command should prompt you for your login credentials, usually in the form of a password; after you input it, you should be dropped into an interactive shell, in which you can input commands just as if you had launched a terminal on your own machine.
It’s also possible to directly run an individual command on the remote; you can accomplish this with:
ssh [USERNAME]@[HOSTNAME] [COMMAND]
where [COMMAND] is the command you wish to execute on the remote.
Note that if the command is interactive (like running python), then you also need to specify the -t option, otherwise you will not get an interactive session.
To run multiple commands, you can enclose [COMMAND] in quotation marks (' or ").
The former are preferable, since the latter may suffer from shell parameter expansion, which can be illustrated with a simple example, in which we’re just printing out the name of the current user:
myname@machine:~$ ssh othername@remote 'echo $USER'
othername
myname@machine:~$ ssh othername@remote "echo $USER"
myname
The former sends echo $USER to be run on the remote, and the variable $USER is expanded by the shell on the remote, while the latter is expanded by the shell before sending it to the remote, so what’s actually being run on the remote is echo myname, which is usually not the intended behaviour.
Basically, you should use single quotes to run multiple commands, unless you know exactly how the command to run will be interpreted.
Running graphical programs
By default, you cannot run graphical programs on the remote; in order to instruct SSH that you want the ability to run graphical programs, you can use the -Y option when connecting.
Since graphical programs tend to be more bandwidth-heavy than command-line ones, to speed things up on a slow connection, you can use the -C option as well, which instructs SSH to use compression when transferring all data between your machine and the remote.
Copying files
Any files you create or modify on a remote will by default stay on the remote, so you need a way to copy them between your machine and the remote.
To accomplish this, you can use scp, which is usually installed alongside the SSH client.
The syntax is similar to the cp program, with a slight modification; you can use the following to copy files from your machine to the remote:
scp [ORIGIN] [USERNAME]@[HOSTNAME]:[DESTINATION]
where [ORIGIN] is the path on the remote to the file(s) (or directories) which you want to copy, and [DESTINATION] is the local path where you want to place them.
The syntax is inverted when you’re copying from the remote to your machine:
scp [USERNAME]@[HOSTNAME]:[ORIGIN] [DESTINATION]
The only notable difference compared to cp is that you need to specify the details of the remote, i.e. the [USERNAME]@[HOSTNAME] part.
Much like the cp command, if you need to copy an entire directory, you must add the -r option.
As scp is somewhat basic, I would recommend the usage of more modern alternatives such as Rsync, which has:
- support for resuming interrupted file transfers
- on-the-fly compression (for faster transfers)
- an option to show current progress of the transfer
The syntax of rsync is similar to scp:
rsync [USERNAME]@[HOSTNAME]:[ORIGIN] [DESTINATION]
with the corresponding equivalent for copying from the local machine to the remote.
Some of the more useful Rsync options are:
-a- preserve everything about a file/directory (permissions, times, etc.)-v- increase verbosity-P- show progress and enable resume-able transfers
Reducing your keystrokes
There are two issues with the above connection method in terms of efficiency:
- you need to repeatedly specify the details (username and hostname) of a remote.
- you need to repeatedly input your password.
The above, even if you’re using something like a password manager, can become tedious if you’re regularly working with remotes.
Below I am going to describe commonly used solutions to both of these issues.
Solution to 2: SSH keys
An SSH key is an alternative to using a password, which functions like a key - you use it to gain access somewhere, in this case, a remote machine.
To generate an SSH key, you can use the SSH key generator:
ssh-keygen
The key generator will then prompt you for a path where to save the key file.
A good place to store them is ~/.ssh/id_[REMOTE_NAME], where [REMOTE_NAME] is just a label you can give to that remote; of course, they can be placed anywhere, as long as you don’t forget where you put them.
Next, you’ll be asked to set a password for the SSH key, which can be left blank if you want2.
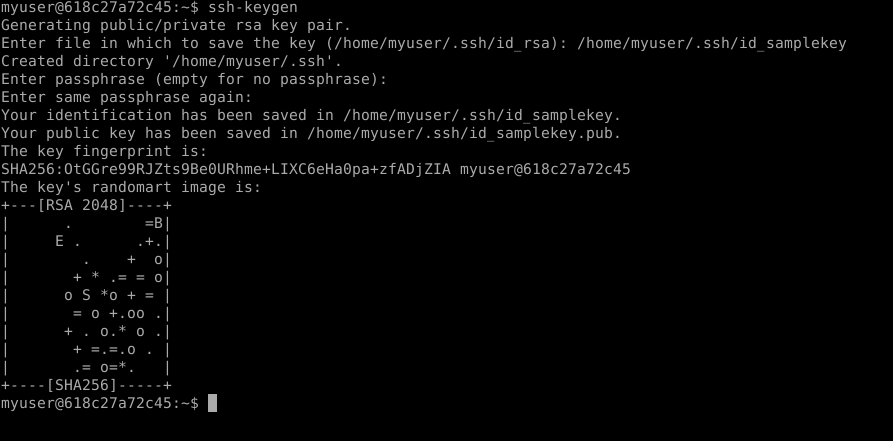 SSH keygen in action. In case you’re curious about the “randomart image”, see this superuser.SE answer
After you’ve done that, two files will actually be generated in the path you specified: one is the private key, which must not be shared with anyone, and another, public one, with the same name, but an additional .pub extension, which can be freely shared.
To use that particular SSH key to connect to a given remote machine, you need to inform the remote that the key exists, and that it belongs to you; in order to do that, you copy the public SSH key on the remote, using:
ssh-copy-id -i [KEY_FILE] [USERNAME]@[HOSTNAME]
where [KEY_FILE] is the location where you saved the key.
As a response, the remote will prompt you for your password; bear in mind, you should input the password for the remote, not the password for the SSH key.
If the copying was successful, you should then be able to connect to the remote using just:
ssh [USERNAME]@[HOSTNAME]
without having to enter any passwords.
If a password prompt still appears after copying the key to the remote, there are two possible causes:
- the key was not added to the SSH agent (the program which manages your SSH keys); to resolve this, run
ssh-add [KEY_FILE], and input the password for the SSH key (again, if you set one). If after running this command you get an error mentioning the SSH agent, go to step 2 below. - the SSH agent itself is not running. You can solve this with
eval `ssh-agent`; this runs the SSH agent as a background process, so it doesn’t stop running when you close your terminal. Once this is done, you can re-add the file using the command from step 1 above.
You only need to run the SSH agent and add the keys once (until you reboot or logout from your local machine), which saves a lot of hassle of inputting passwords.
Solution to 1: SSH config file
To save yourself needless keystrokes when inputting the details of a remote, you can use the SSH configuration file, usually located at ~/.ssh/config.
As an example, you can place the following in the file:
Host [ALIAS]
    HostName [HOSTNAME]
    User [USERNAME]
    IdentityFile [KEY_FILE]
where [ALIAS] is the label (alias) you’ve chosen for the remote with a domain/IP address [HOSTNAME].
This way, you can run ssh [ALIAS] to connect to a remote without any password prompts, or extra keystrokes.
Of course, multiple remotes can be defined in the config file, otherwise it wouldn’t be of much use:
Host [ALIAS1]
    [OPTIONS1]

Host [ALIAS2]
    [OPTIONS2]

...
Make sure to use different aliases for different remotes though, otherwise unexpected problems may arise.
If you’re using the IdentityFile option in the configuration file, the SSH agent may prompt you for the password of the SSH key when you’re connecting to a remote; this indicates that the SSH key, which is protected by a password, has not yet been added to the SSH agent; in this case, you should run ssh-add [KEY_FILE] to add the key, so you don’t have to type in the SSH key password every time you connect to that remote.
For all of the available configuration options, see the manual of SSH config at man ssh_config (also available online).
Useful SSH options
SSH comes with many command-line options, and covering all of them would take forever, so instead I will just list those which I find handy and use often.
-C- use compression before sending any data to or from the remote; useful if your network connection is slow.-X- allow launching of graphical programs (web browser, text editor etc.) when connecting to a remote.-f- put the SSH connection in the background. With this option, you must specify a command on the remote to run. Useful with the-Xoption above.-t- as mentioned above, force SSH to provide an interactive session; useful when you want to run an interactive program on the remote with something likessh [USER]@[HOST] [COMMAND]-i [KEY_FILE]- specifies the SSH key which should be used when connecting to a given remote-L [LOCAL_ADDRESS]:[LOCAL_PORT]:[REMOTE_ADDRESS]:[REMOTE_PORT]- described in more detail in section Proxying local connections-D [LOCAL_ADDRESS]:[PORT]- described in more detail in section Using a remote as an Internet proxy-N- do not run any commands on the remote. Just runningssh [USER]@[HOST]actually runs a login shell (something like/bin/bash), whereas with the-Noption, nothing will be run on the remote. Useful with the-Land-Doptions above.
Consult the SSH manual at man ssh (also available online) for more information about the various options.
Extra: using a remote as an Internet proxy
It is actually possible to use a remote as an Internet proxy for various programs such as a web browser. This has some use, such as bypassing network restrictions; for instance, some web pages require you to be on the local network in order to be able to access certain resources3.
In order to instruct a network port on the remote to act as a proxy, you can use the following command:
ssh -D [PORT] [USERNAME]@[HOSTNAME]
where [PORT] can be any number between 1024 and 65535 (inclusive), as long as SSH doesn’t report that it’s already in use.
To in order use this port as a proxy, you need to instruct your local programs to use it; while the exact procedure varies wildly between applications, a common use case is proxying connections in your web browser, so below I will describe the procedure for setting up both Firefox and Chromium (or Chrome).
Firefox proxy settings
To find the settings, either input about:preferences in the address bar, or click on ☰ (the hamburger/sandwich menu), and go to Preferences, then scroll all the way down to Network Settings.
In that menu, you should check Manual proxy configuration, and set the hostname of the remote under HTTP Proxy, as well as [PORT] from above under Port.
Additionally, you should set 127.0.0.1 as the SOCKS Host, with [PORT] being the corresponding Port, as shown below.
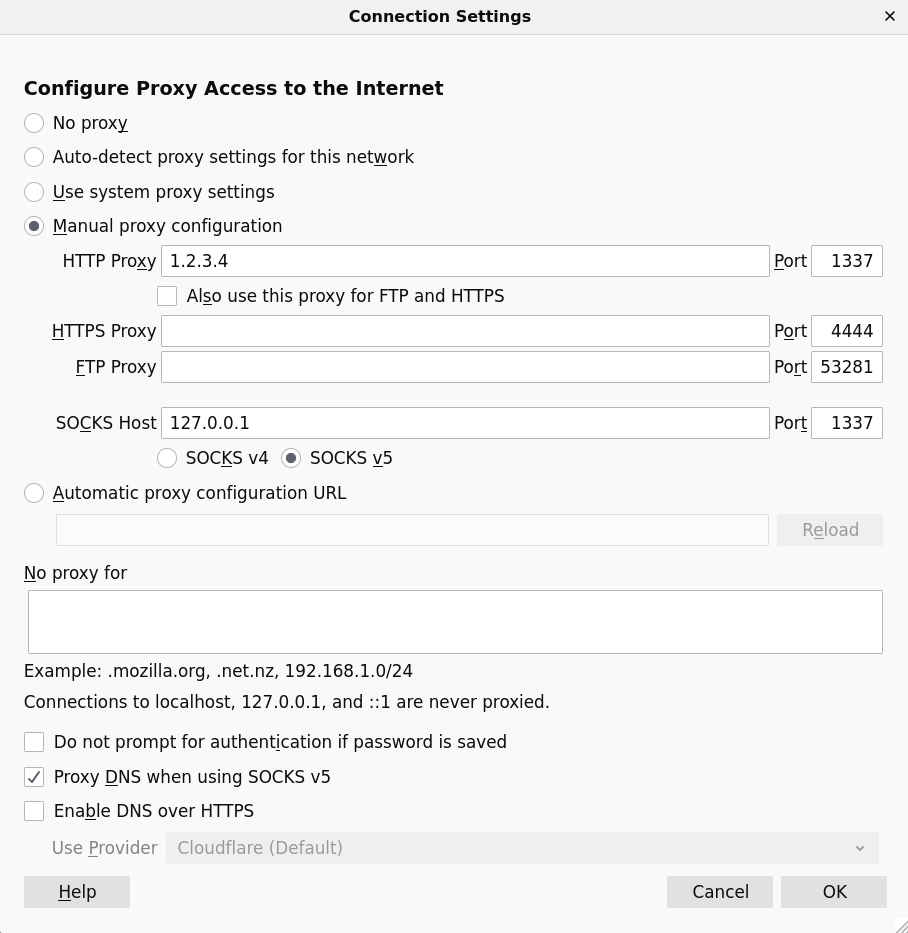 Firefox Network settings dialog with custom HTTP proxy
To stop proxying the connection on Firefox, simply go back to Network settings and restore the previous settings (usually No proxy or Use system proxy settings).
Chromium proxy settings
For some reason, Chromium does not appear to have a graphical interface for configuring proxy settings (at least on Linux), and instead, you need to launch it with the following option:
--proxy-server="socks5://localhost:[PORT]"
Unfortunately, Chromium will continue using the proxy connection until you close Chromium itself, so the only way to stop proxying is to re-launch Chromium without the above option.
Extra: proxying local connections
If you’ve ever used a Jupyter notebook, you’ve probably noticed that it’s running on a network port on the local machine:
[I 16:47:37.946 NotebookApp] The Jupyter Notebook is running at:
[I 16:47:37.946 NotebookApp] http://localhost:8889/
On certain occasions, you may wish to run the notebook on a remote; for instance, if the data you’re processing is unusually large, or your local hardware is limited compared to the remote.
In any case, this can also be solved using SSH + some network port binding magic, which can be achieved with the following command:
ssh -L localhost:[LOCAL_PORT]:localhost:[REMOTE_PORT] [USERNAME]@[HOSTNAME]
After running the above, you can go to localhost:[LOCAL_PORT] in your web browser, and you’ll be able to access whatever is running on [REMOTE_PORT] on the remote machine.
Even if your connection gets interrupted, the application will keep running on the remote.
Bear in mind that port binding of this kind works for any application, not just Jupyter notebooks, as long as the application runs on some network port.
Advanced usage - mounting remote directories
While SSH coupled with SCP does allow copying between your machine and the remote, it’s sometimes inconvenient when you want to, say, view a file in a graphical environment.
Using ssh -Y can come in handy, but it can happen that the program on the remote is relatively ancient (as is frequently the case on many-user systems), or even unavailable, in which case the naive procedure to work with files on a remote is the following:
- copy the files from the remote to your machine
- do the necessary work on the files
- in case you’ve made any changes, copy them back to the remote
The above 3-step procedure isn’t an issue when you need to do this infrequently, but gets annoying if it’s done on a regular basis, especially if you’re working with a large number of files. Thankfully, there’s a solution for that as well, in the form of SSHFS.
SSHFS in brief
The SSHFS program allows you to locally mount a remote directory4. You can think if it like mounting a USB stick, except in this case, you’re mounting something over the Internet.
Installation
On most Linux distributions, SSHFS should be available in the package sshfs (or similar); consult your local package manager for details.
On macOS, it’s available for download here.
Mounting the remote directory
Mounting a remote directory is as simple as:
sshfs [USERNAME]@[HOSTNAME]:[ORIGIN] [DESTINATION]
where [DESTINATION] should be an empty directory5.
With SSHFS, you can skip the back and forth copying of the files, and let SSHFS do it for you.
Once you’re done, you can simply unmount the remote directory with:
umount [DESTINATION]
Note that SSHFS is primarily useful when have many smaller files on a remote, and not when you’re handling enormous (multiple GB or larger) single files, or have a very slow (and possibly unreliable) Internet connection; in such cases, SCP or Rsync would probably be more useful.
Notable issues
SSHFS is not by any means perfect; it’s worth mentioning this bug, which can cause any program which is using any file in the mounted directory (including the file manager application) to become unresponsive for a while if the remote suddenly becomes unreachable.
A useful workaround is given here, which amounts to running sshfs with the following options:
-o reconnect,ServerAliveInterval=15,ServerAliveCountMax=3
Using these options should force SSHFS to disconnect from the remote a minute after it becomes unreachable, so that local programs using the files in the mounted directory aren’t unresponsive for too long.
Part 2: Preserving console environments
To provide motivation for this section, consider the following scenario: you are doing something on a remote machine - it could be something completely trivial, like lsing a directory; or, much worse, actively running a simulation or moving files around - and all of a sudden, you notice that your Internet connection stopped working.
This is usually indicated by the remote not responding to any keyboard input, followed by a message such as Write failed: Broken pipe, after which any process on the remote that is running in that terminal will be stopped.
To prevent this from happening again, there are two solutions you could consider:
- run anything that you don’t want to be stopped when you exit using
nohup [COMMAND] &. This basically tells the remote to run the command in the background, and, additionally, ignore a signal which is sent when you, either intentionally or accidentally, close a connection to the remote. With this option, any output of the command will by default be located in the directory in which you originally launched the command, in a file callednohup.out. This solution is somewhat inconvenient though, since then stopping the process is not as straightforward as pressing Ctrl+C, not to mention you can’t re-attach to the process (i.e. you cannot make it interactive again) without a lot of hassle. - use dedicated software which preserves the state of your environment, such as GNU Screen or Tmux. Out of those two, I’ve only tried out Tmux in more depth, so below I will provide a brief overview and example usage of Tmux.
Installation
Depending on your operating system and access rights, Tmux can be installed in various ways.
Note that it should be installed on the machine where the work is done; in other words, it’s not necessary to install Tmux on your local machine if you will mainly work on another, remote one.
That said, I use Tmux on my own machine as well, to preserve my work environment for different projects, and then come back to them if necessary. This way, I don’t need to waste time recreating the environment every time I want to work on a given project.
Linux distributions
Tmux is usually available in the main package repositories, as shown in the below table (taken from the Tmux wiki):
| Platform | Install Command |
|---|---|
| Fedora | dnf install tmux |
| RHEL or CentOS | yum install tmux |
| Debian or Ubuntu | apt install tmux |
| Arch Linux | pacman -S tmux |
| openSUSE | zypper install tmux |
If your distribution/package manager isn’t listed, you can check the above link to the wiki, which offers instructions on how to obtain and build it from source.
MacOS
Tmux can be installed using Homebrew:
brew install tmux
On a remote machine
As sometimes you lack the privileges to install packages using the remote machine’s package manager, it’s probably best to consult with your local sysadmin(s) about installing Tmux.
Basic usage
To check whether Tmux is available on a given machine, run:
command -v tmux
To start a Tmux session, just run the command tmux; this should drop you into a shell in the current directory, which is shown below:
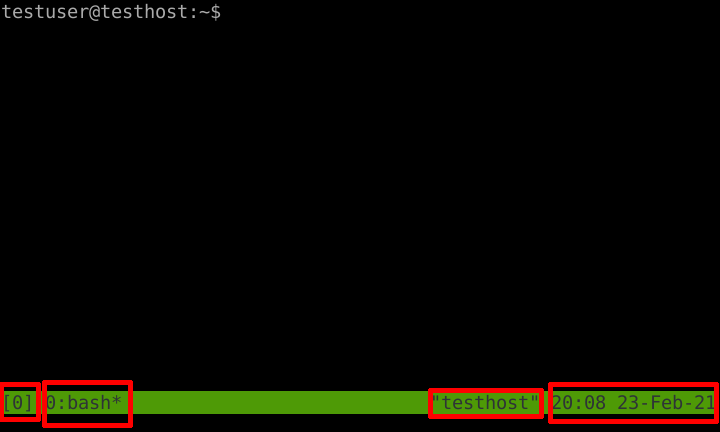 Tmux default session window
In red, I’ve highlighted some notable features in a Tmux session that are shown by default; from left to right, we have:
- the name of the Tmux session (by default a number, starting from 0)
- the currently active program in the currently active window
- the hostname of the machine
- the local time at the machine
A Tmux session can contain windows and panes. Windows are sort of self-explanatory, they take up the entire screen, and you can switch between them. Additionally, you can spawn multiple panes inside of them.
Below is an illustration of a session with multiple windows, and a bunch of panes:
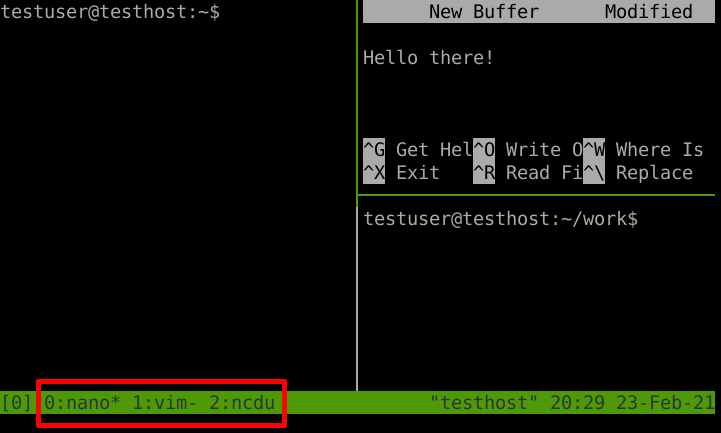 Tmux session with multiple windows and panes
The green outline of the pane denotes the currently active pane inside the window.
Note the red highlight - these indicate that we have three Tmux windows in this session, denoted by the numbers 0, 1, and 2, which are running nano, vim, and ncdu, respectively.
The * next to the program name denotes the currently active window, while the - denotes the previously visited window.
Now, since Tmux is heavily keyboard oriented, it’s a good idea to know how to perform certain actions while in a Tmux session, and below are just some examples.
- detach from a running Tmux session. To do this, press Ctrl+B, followed by D while inside the session. Note that any programs running in that session will continue doing so until you actually shut down that session.
- list running sessions, using
tmux ls. This works both inside and outside a session. - re-attach to a running session by running
tmux attach-session -t [SESSION_NAME], where[SESSION_NAME]is the session name. The names are listed in the first column of the output oftmux ls. Note that you must be outside a Tmux session for this to work since it’s not a good idea to nest sessions. - switch between active sessions. To do this, while in a session, press Ctrl+B followed by S, then select the one you want to switch to.
- create a new window in the current session using Ctrl+B, followed by C
- show the window selection menu for the current session using Ctrl+B, followed by W, then select the window you want to switch to. You can also use Ctrl+B, followed by the number of the window to switch to that window.
- split the current window into panes, be it horizontally or vertically, using Ctrl+B, followed by %, or ", respectively.
- switch between panes using Ctrl+B, followed by O
Since this can be somewhat overwhelming if you’re used to using the mouse, Tmux comes with a handy configuration file, located at ~/.tmux.conf, in which you can tweak its settings to your liking.
In particular, insert the following to enable the mouse in a Tmux session:
set -g mouse on
The above configuration option only works on Tmux versions 2.1 and above, so if you’re running an older version (which can be checked by running tmux -V), use the following instead6:
set -g mouse-select-window on
set -g mouse-select-pane on
set -g mouse-resize-pane on
Note to UNIGE HPC users: at the time of writing, the Tmux version on both Baobab and Yggdrasil is 1.8.
Once one of the above is in your Tmux configuration file, you can resize the panes by dragging their borders around with the left mouse button. You can also press and hold the right mouse button inside a pane for more options, such as splitting it into additional, smaller panes, and swapping their order, so you don’t need to remember the keyboard shortcuts (except the one for detaching from a session, though you can also just close your terminal window). To select an option, just let go of the right mouse button while hovering over an option. Right-clicking on the lower region containing the session name or a running window yields some additional options.
You can also scroll through the buffer (output history) just like in a regular terminal, though there are some minor tweaks that need to be done in order to get this to work correctly with text editors such as Emacs or Vim.
Another useful aspect is the ability to specify the default shell if the one Tmux chose isn’t up to your liking, which can be done with:
set-option -g default-shell [SHELL]
where [SHELL] is the full path to the shell program.
As mentioned earlier, both the Tmux commands as well as the shortcuts can be fully customized to suit your workflow.
For more information, I’d recommend you consult the wiki page, and/or run man tmux to see the Tmux manual (also available online), there’s plenty of info there.
In particular, an amazing cheatsheet with a lot of the common commands and shortcuts is available on this Github gist.
SSH + Tmux workflow
In essence, your workflow could now be roughly as follows:
- SSH to a remote.
- spawn a new Tmux session, or connect to an existing one.
- do your work inside the session(s).
- in case you need to disconnect from the remote for whatever reason (putting your machine to sleep, loss of network connection, etc.), afterwards just go to step 1 - in case you have running sessions, they will remain exactly in the state you left them.
There is one caveat though: if the machine that is running Tmux is rebooted, be it local or remote, all of the sessions will be lost, and you will have to rebuild them.
Part 3: Preserving graphical environments
So far I’ve covered how to keep command-line programs persistent between SSH sessions, so the natural extension of that would be a way to keep graphical applications persistent as well. In this last part of the post, I’ll cover how to accomplish this using x2go.
Installation
Much like SSH, you’ll need:
- a machine running an x2go server (the remote)
- a machine running an x2go client (the local machine)
The x2go macOS client is available on the downloads page, and, as also mentioned there, the client for Linux distributions is usually available in the standard package repositories (currently x2go-client on Debian).
Since graphical applications are less commonly used on remotes, I’d suggest you contact your local sysadmin about installing and running the x2go server if it’s not available.
Basic usage
While it’s mostly straightforward to use x2go, for the sake of completeness, I’ll describe some basic usage below.
When you first start x2go, you should be greeted by a prompt like the one below to make a new session:
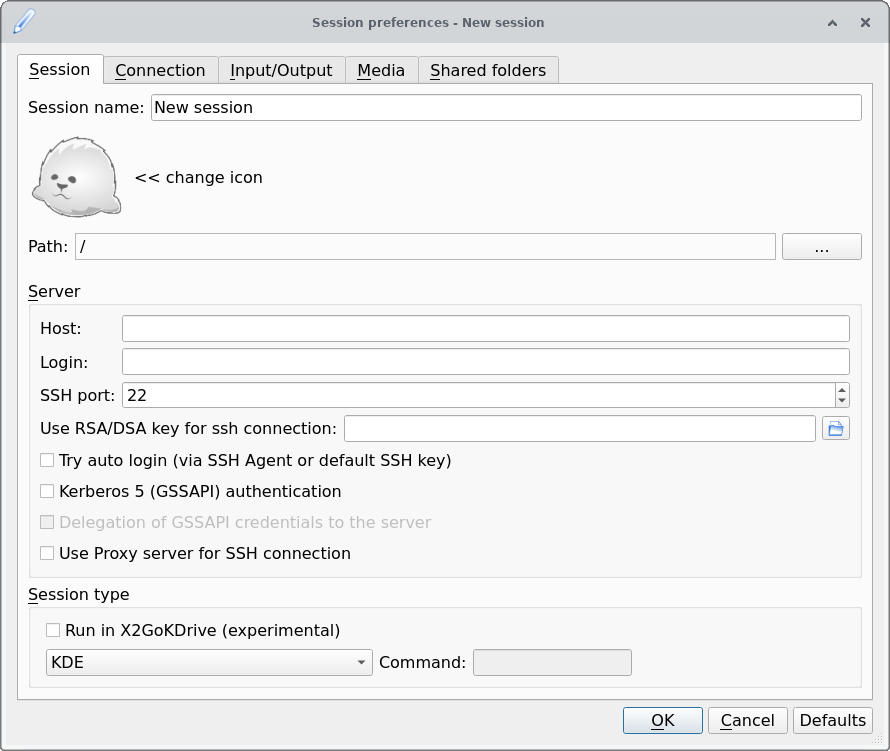 x2go session dialog
The only mandatory parameters in the above are the Host and the Login fields, which correspond to the hostname and username when using SSH.
If you have an SSH key set up for that remote, then you insert the path to it in the Use RSA/DSA key… field; if you already added that key to the SSH agent, you can just check Try auto login below so you don’t have to bother with SSH key passwords.
The only other option that should be changed from the default is the Session type, which strongly depends on what’s available on the remote; a lightweight desktop environment such as XFCE is usually a safe bet.
Once you fill out the session preferences and click Ok, you should see something like this:
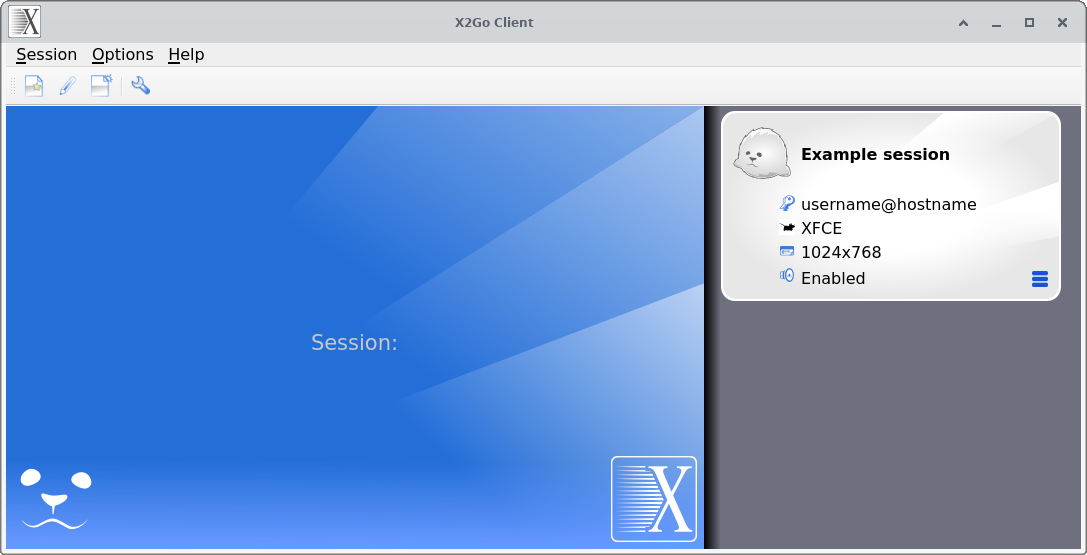 x2go main window
Clicking anywhere inside the “bubble” on the right-hand side with the session name (silver rectangle with rounded corners) will launch an x2go session on that remote.
The four (editable) fields are, from top to bottom:
- the username and the hostname used to connect to the remote
- the type of session to launch (full desktop environment such as XFCE, just a single application etc.)
- the resolution at which the session will run
- whether or not sound should be enabled in the applications running in the session
Another way to launch a session is to click anywhere inside the big blue square and type its name (it even has autocomplete!); this is mostly handy when you have many sessions and don’t want to scroll down the list on the right.
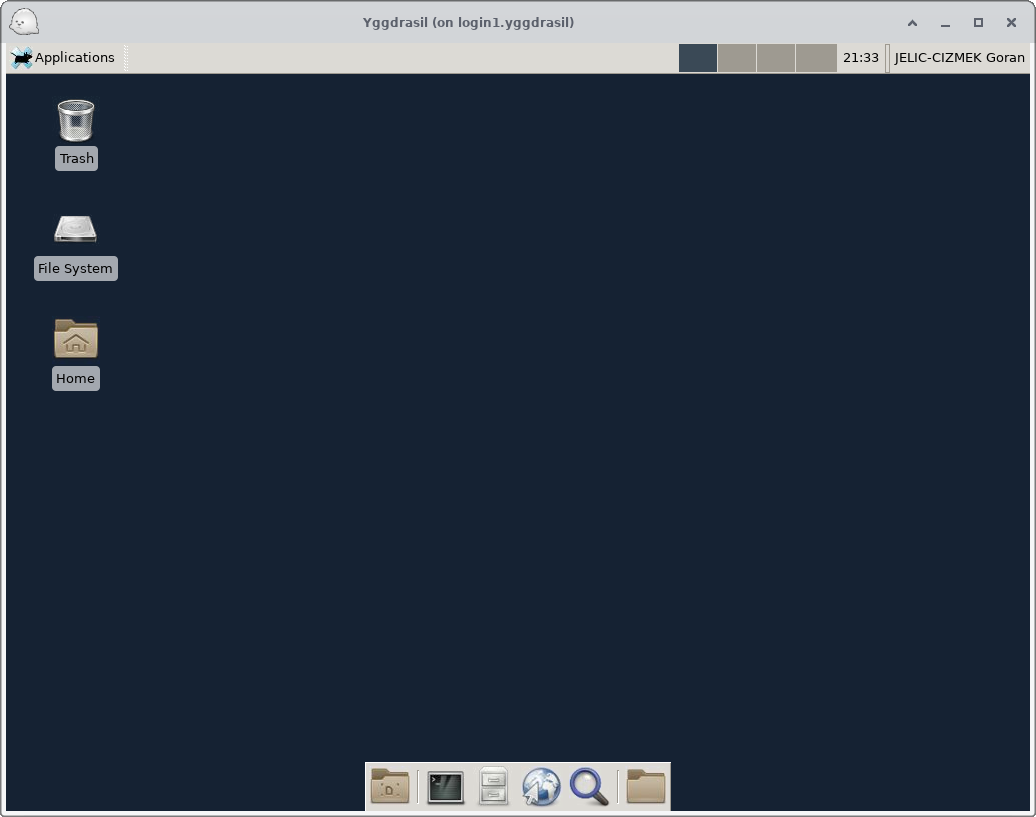 Running the XFCE desktop environment on a remote
To add a session, click Session → New session …, which will then open up a new window, just like the one when you first started x2go.
When you actually launch a session, the x2go main window should look something like the below image.
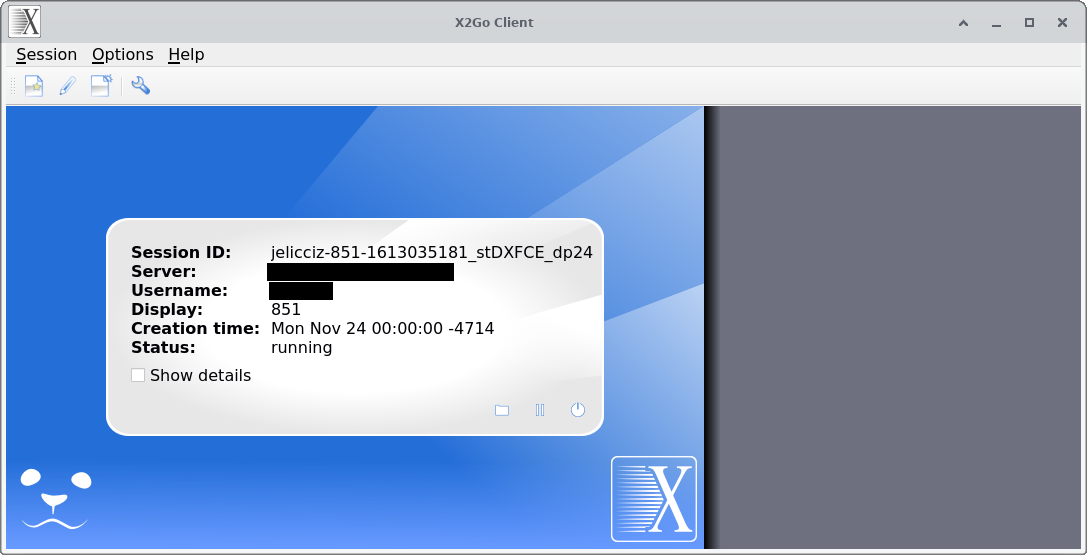 x2go main window during a running session
From left to right, the three icons in the lower-right corner of the silver “bubble” denote:
- the 📁 (folder) icon - option to share a folder
- the ⏸️ (pause) icon - suspend the current session
- the ⏻ (shutdown) icon - terminate the current session
Thus, if you want to disconnect from a certain session, but have the option to get back to it, you should click the suspend icon. Note that the term “suspend” is a bit of a misnomer in this case; the graphical session will actually still be running on the remote, so you should regard the ⏸️ (pause) button as “disconnect from the session, but keep everything running on the remote so I can come back to it later”. On the other hand, the terminate button actually terminates the whole session, in which case, any programs running in the session will close.
Note that if you close the session window by clicking the close button (X or whatever), the session will be suspended instead of terminated. Depending on how long it takes for the remote to respond to the suspend signal, the session window may take quite some time to actually close, especially on slower networks.
Sharing folders
Since I’ve covered the other two actions, it’s time to backtrack a bit to the “share a folder” option.
Essentially, this option can do the inverse of what SSHFS above does: it mounts a local directory on the remote, so you can access it on the remote.
To share a given folder, do the following:
- if you’re already running a session, click on the 📁 (folder) icon in the x2go main window. If not, click on ☰ (the hamburger menu) in the silver “bubble” of a given session, then on Session preferences …, and go to the tab called Shared folders
- if you want to one-time share a directory (only available if a session is already running), click on Custom folder … and select a directory you want to share
- if you want to share a directory with the remote on a regular basis, click Preferences …, then on the folder-looking icon, and choose a path. Click Add, and the path to the selected directory should become visible on the list of paths. For simplicity, keep the Use SSH port forwarding… option checked, and also check the Automount option
 Settings for sharing a directory
Once you’ve either done the one-time share or the regular one, navigate to the directory ~/media/disk inside the x2go session; your shared folder should be waiting for you there.
Note that the name of the shared folder will be the path on your local machine, but with directory separators (/, or \ if you’re on Windows) replaced by underscores (_); for example, if you mount the directory /home/myname/Documents, on the x2go session it will appear as _home_myname_Documents.
Limitations
Just like any other piece of software, x2go isn’t perfect.
One somewhat annoying limitation is that you can only connect to a single remote at a time (the ability to connect to multiple remotes is currently work in progress), so in order to connect to a different one, you need to first suspend or terminate the currently running one.
Another, albeit minor, issue, is that there’s no way to tell whether a given session is currently active (well, “suspended” in x2go parlance) or terminated (not running), so you need to keep track of this manually.
Final words
If you’ve made it this far, congratulations! I hope that you’ve learned something new from this tutorial.
If you happen to have any questions or comments, don’t hesitate to contact me on the email address written at the bottom of this page, or open up an issue on Github.
Appendix
This is where all of the extra tricks go that aren’t necessarily directly related to the above, nor are frequently used, but may come in handy at some point.
Changing your login shell
If the default shell on a remote or even your own machine doesn’t quite suit your needs, there’s actually a way to change it.
When you launch your terminal application, or connect to a remote using SSH, what happens is that they usually run a login (interactive) shell; this login shell that runs can be changed using:
chsh -s [SHELL]
where [SHELL] can be any one of the entries shown in the file /etc/shells.
This way, you can run your preferred shell when connecting to a remote, assuming that it is available there.
As an aside, Tmux itself can actually be set as the login shell, which is quite convenient since you don’t have to worry about losing your work should networking failures or other issues arise, as a Tmux session will immediately be spawned as soon as you login.
Automatic mounting of remote directories with /etc/fstab
NOTE: this part requires editing a special file. If you’re not careful, it’s possible to render your system unbootable, so it’s advisable to pay extreme attention to what you’re doing. In particular, if the file already contains some entries, do not delete or modify them!
With that out of the way, let’s proceed.
On UNIX-like systems (such as Linux and macOS), there’s a special file located at /etc/fstab (short for filesystem table), which is used to specify what to mount and where to mount it.
This file is useful because, with the right configuration, you can make a remote directory directly mountable/unmountable in graphical utilities, as well as with the command (un)mount [DESTINATION], so you don’t need to specify any details of the remote.
To specify that you want to mount a remote directory using SSHFS, you can add the following line to your /etc/fstab file:
[USERNAME]@[HOSTNAME]:[ORIGIN] [DESTINATION] fuse.sshfs rw,noauto,_netdev,reconnect,ServerAliveInterval=15,ServerAliveCountMax=3,IdentityFile=[KEY_FILE] 0 0
The various options and the structure of the fstab file are described in more detail here, while the purpose of the options written in SnakeCase can be found by running man ssh_config and man sshfs.
N.B. on macOS, the file /etc/fstab most likely doesn’t exist, in which case you can just create it yourself.
Proxying the connection through multiple remotes
Let’s say you need to connect to a remote machine, but with an additional remote machine in between (like a login node).
In case you want to skip the machine in between, you can add the following to the ~/.ssh/config file:
Host [ALIAS]
    HostName [HOSTNAME_OF_LAST_REMOTE]
    User [USERNAME_ON_LAST_REMOTE]
    ProxyCommand ssh [USERNAME_ON_FIRST_REMOTE]@[HOSTNAME_OF_FIRST_REMOTE] -W %h:%p
    IdentityFile [KEY_FILE]
This way, running ssh [ALIAS] will directly connect you to the last remote (assuming of course that you’ve copied the SSH key to it).
Footnotes
-
in principle, you can connect to your own machine as well, but this is usually not that useful ↩
-
keep in mind, if you leave it blank, and somebody gains access to your machine, they can then access the remote that the key corresponds to with zero effort ↩
-
there is usually a good reason for that, so I would not encourage you to use it for this purpose, unless you’re absolutely sure that there won’t be any serious ramifications, legal or otherwise ↩
-
there are much more powerful remote mounting solutions such as NFS or Samba, but they’re not as lightweight nor as simple to use as SSHFS ↩
-
you can mount it in a non-empty directory as well, but this is not good practice since there may be collisions between the local and remote filenames ↩